Sunday, September 6, 2009

Cameo Quilt Card

Hi Everyone,

Here is another card made with one of my favourite colour combos. This was done with whisper white, cameo coral, real red, and old olive cardstock. I punched out 1 1/2" squares using my CM square maker. When I had three of each colour I ran the squares through my cuttlebug using the d'vine swirls, distressed stripes, script, and swiss dots folders. Then I glued them onto a piece of scrap cardstock that I had cut so it was aobut 1/4" bigger than my bigz top note die. In order for the quilt to look most appealing I started with the centre two squares and worked out from there. When I had all of the squares where I wanted them I lined up the middle two squares with the middle of my top note die and ran it through the cuttlebug. Now I have a patchwork quilt top note die.

To accent my card I used my polkadot punches stamp set. The centre of my punched flower is covered with an extra brad topper from the build a brad set.

"Smile" was stamped with chocolate chip ink.


Recipe:
Ink:Chocolate chip, Real Red, Old Olive, and Cameo Coral
Accessories: SU top note die, swiss dots, script, distressed strip, and d'vine swirl cuttlebug folders, build a brad, SU corner ticket punch, Creative Memories Square Maker
Paper: SU old olive, real red, cameo coral, and whisper white cardstock
Stamp set: SU polka dot punches

Enjoy and Happy Crafting,
Catherine

Friday, September 4, 2009

Cameo Christmas Card

Hi Everyone,

I just received my latest SU order and it included the sweet treat cups as well as the Serene Snowflake stamp set. I got a chance yesterday to play with my new stamp set and decided to do a non traditional Christmas card using one of my favourite colour combinations Cameo Coral, Real Red, and Old Olive. I cased a card done by Wannabestampin' over at splitcoast stampers. It was a gorgeous card done in browns and was a beautiful layout. I wanted to see what it would look like done in bright colours.

I used my cuttlebug embossing folders (swiss dots, snowflakes) to addd some texture. I decided to use the Rock n Roll technique to ink up my snowflakes and they turned out really nice. I like how this technique adds dimension and visual interest to your stamped image.

Finally I finished the card off with a bit of stardust stickles and some old olive coloured ribbon from my stash.


Recipe:
Paper: SU Old Olive, Cameo Coral, Real Red, Whisper White
Accessories: Cuttlebug embossing folders (swiss Dots, snowflakes), green ribbon, gold mini brads
Ink: Cameo Coral, Real Red, Old Olive
Stamp Set: SU Serene Snowflakes

Happy Crafting,
Catherine

Thursday, September 3, 2009

Storybook 3.0 has new text formatting features!

Hi Everyone,

I created a layout this morning and played with some of the new text features that Storybook Creator 3.0 offers.

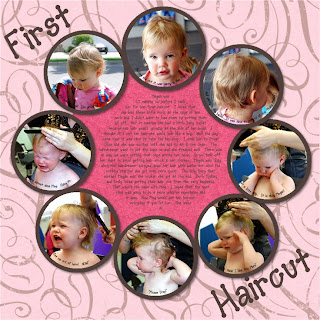
First off I used the free template that I found on the Creative Memories Digital Freebie Website. This is a fantastic site to visit and boost your digital content for free. Once I had the template I altered it to meet my needs. I didn't have as many photos as were in the template so I deleted some photo frames and enlarged the photo frames that were left. Another option would have been to fill some of the empty photo frames with patterned paper or used them as text boxes.

Next I decided to change my text box in the middle so the text would fill in an eliptical shape. To do this click on the "Format Text" ribbon. Select your text box and click on text shape. Now you have a ton of shapes to choose from. I chose the elipse so it would mimic the shape of the middle circle.

The other thing I tried was using the "Text Path" feature. To use this feature you click on the "Insert" ribbon on your tool bar. Select "Text Path". A dialog box comes up where you can choose how you want your text to flow. I decided to stay with the default option. Then you click anywhere on your page to create a path. I wanted my text to follow the circular path on each of my photos. I simply placed a few points at the bottom of my photo until I had the effect I wanted. Once you have the path you want click create and the path is layed out for you on the screen. If you aren't happy then you can select "edit path" and move your points around.

Now all you do is type your text and it will follow the path your created. I found that in my case my text wasn't centering so I just placed a few spaces in front of my text until it was placed where I wanted it.

The other new feature that I played with is the rubber stamping feature. I used the rubber stamping feature on my Earthly Serenity overlay. This gives a really neat rubber stamped effect to your image. To use this feature I added my overlay to my page. While the overlay was selected I right clicked and selected "rubber stamp" from the drop down menu. A dialogue box comes up and you can play around with the various options until you get the desired effect. When you are done click create and a rubber stamped version of your element appears on your page. I played around with the placement of this image and tried layering it over my original overlay for a pretty neat look. In the end I deleted my original overlay and just used my rubber stamped overlay.

I also played with the opacity of my rubber stamped overlay so it wasn't quite as intense.


Here is the recipe for the layout above:
Storybook Creator Plus 3.0
Creative Memories Earthy Serenity overlay #8
Creative Memories Freebie Template
All colours for this layout were sampled from Stampin Up colours (Melon Mambo, Pink Pirouette, Chocolate Chip (altered a bit), and Close to Cocoa. I will explain how to do this in a future post.

Happy Crafting,
Catherine

Wednesday, September 2, 2009

SU Sweet Treat Cups Birthday Card

Hi Everyone,

My sister in law just dropped off my latest SU order today. I ordered some Sweet Treat Cups as well as the Serene Snowflakes stamp set. I couldn't wait to try out the sweet treat cups and I had the perfect opportunity. We are having a birthday party for my other sister in law so I thought I would try and create a birthday card for her and use the cups as well.

For this card I followed the instructions on the "Stampin-Style" blog where he gives instructions on how to create a card with a trap door so your hard work doesn't have to be ruined to get the candy out of the treat cup.

The inspiration for my card came from the new holiday mini catalogue on page 20. The card is complete except for the missing treats that I need to run out and get. I am planning on filling the treat cup with pink and brown smarties to stick with my colour scheme.


Here is the recipe for my card:

Paper: Stampin Up Chocolate Chip, Melon Mambo, Whisper White, and Pink Pirouette. The tag was cut out of a DCWV stack (not sure which one)

Ink: Stampin Up Chocolate Chip

Accessories: Ribbon from my stash, SU Bigz Top Note Die, SU Scalloped Edge Punch, Mini Mongrams Cricut Cartridge, Pooh Font Cartridge for the sentiment, Design Studio to weld sentiment together, Creative Memories circle cutter and blue blade to create 1 3/4" circle, SU Sweet Treat Cups

I had a lot of fund creating this card and encourage all of you to try the new sweet treat cups! Lots of fun.

Happy Crafting,
Catherine

Stamps: House Mouse stamp, Studio G dollar stamps for sayings

Tuesday, September 1, 2009

My First layout with Storybook Creator Plus 3.0!

Well I promised you I would create a layout with my template I created earlier today and I finally got a chance to finish it. I decided to use the same colour scheme as my last layout so I could use them together as a double page spread.

The papers are all from the CM Disney Vacation digital kit. I love the bright cheerful colours and patterns in this kit. They work well with layouts involving kids and family.


Enjoy,
Catherine

My first template with Storybook 3.0!

Well I took sometime to check out some of the new features on Storybook Creator 3.0 and let me tell you it is awesome! If you haven't already downloaded the upgrade now is the time to do it!

I know this template is super simple but I did use a few of the new features and it makes creating pages so much easier.

First of all I love that there is now a feature so you can double or even triple your mats around your photos with a click of the button. The old version allowed you to mat your photo but it was a pain in the butt to mat using paper now you can select how many mats you want and choose the type of fill as well.

The other feature I used on this template was the corner rounding feature. There are tons of choices to pick from. I used the plain rounded corner but there are loops and decorative corners galore!

The other feature that I played with was the ability to change the shape of my text. You can create a text box that allows you to write your text in any shape you want. Now you can have circular text boxes or thought bubbles. Anything you want. In the end I chose to stick with a square text box but it was fun to play none the less.

So here you go! My first template. I plan on creating a scrapbook page once I get a few moments so you can see the real deal but I am too excited not to share my draft.


As always I love your comments and if I can help in any way please contact me. I am also willing to share the love, so just leave a comment or email me and I will happily send you the page file of the template you like.

My inspiration for this template came from the Becky Higgins Sketches in the May 2009issue of Creating Keepsakes Magazine. It is also featured on page 45 of the same issue.

Happy Crafting everyone,
Catherine

Creative Memories just released Storybook Creator Plus 3.0 today!

Creative Memories has released the newest version of Storybook Creator Plus. I am so excited about the new updates and am downloading is as well as a few digital kits as I type this out. I will give it a test run and let you know what I think. For those of you who already have SBC+ then the update is only $9.95!