Tuesday, June 30, 2009

Stampin Up Bigz Beautiful Butterflies Die

Hi Everyone,

Here is a card that I cased off of Splitcoast Stampers. This was the first time I used my Bigz Beautiful Butterflies Die from Stampin Up. I originally purchased this die so I could make my own ghost shapes using old cricut cartridge packages. I have been saving the packages because the hard plastic clamshell cases are perfect for using with alchol ink.

Anyway, here is the card. I think it turned out pretty nice and could be used for just about any occasion.


Recipe:

Stampin Up Bigz Beautiful Butterflies Die
Stampin UP Bigz Top Note Die
Parisian Breeze Designer Series Paper
Stampin Up Chocolate Chip Cardstock
Stampin Up Whisper White Cardstock
Stampin Up Inspired by Nature Stamp Set
Stampin Up Chocolate Chip Ink for the sentiment
Stampin Up Old Olive Ink for the grass
Clear Skittles from Michael's

Friday, June 26, 2009

Teacher Survival Kit

I made this Teacher Survival Kit for my daughter's teacher to thank her for doing such a wonderful job this year. My daughter loved going shopping for all of the goodies to fill the tin. We filled the tin with post it notes, pens, hand sanitizer, gummy bears, stickers, and a pencil sharpener/eraser combo. I also included 4 handmade cards that I had made.

The tin is a lunchbox style white tin from provocraft that I picked up at Michael's. I covered the tin with paper from the DCWV grade school stack. I added red ribbon from Michael's. The words are cut from the Sesame Street Font cartridge and welded with Design Studio. The apple on the lid is from doodlecharms.


Salute to Summer. . . Penguin Style!

Well today is the last day of the school year. My oldest daughter celebrated her last day at school with sports day. The whole family is excited that summer has finally arrived. The girls have already asked me a number of times if they can camp out in the backyard. Who knows, tonight may even be the night! My girls had a couple of birthday parties they were attending last week and I thought it would be fun to make some cute penguin birthday cards to help welcome the summer. Here are my four cards. They are super simple but oh so cute. I couldn't resist picking up these little guys when I was in my scrapbook store. The stamps are by imaginisce were only $1.50 each.

I used my Mini Monograms cartridge to cut the circles and scallops for the cards. The circles are cut at 2.5" with real dial size on. The scallops are cut at 3" with real dial size on.

I watercoloured the penguins using my ink pads and an aqua painter. The rest of the supplies were just scraps from my stash. I'm sorry I can't be more specific as to the name or lines of the patterned paper.


Thursday, June 18, 2009

Using Templates to Create Quick Scrapbook Layouts!

As I mentioned earlier digital templates are a fast and easy way to make fantastic looking scrapbook pages without all of the fuss. I have created a template that anyone can use with their storybook software. All you have to do is save this template on your computer and import it into your storybook creator (SBC)software.

The easiest way I have found to do this is to create a storybook called templates. In this storybook I store all of the templates I find online as well as the ones I have created for my personal use.

When I decide I want to use one of my templates then all I do is open the project I am working on. Select "import page" from my "home" ribbon in Storybook Creator (SBC). This brings up a navigation window. I navigate to my "templates" storybook and select the template I want to use. SBC then brings my chosen template into my current project. Once the template is in my current project I can change and modify it however I want.

The easiest way to modify your template is to select the various shapes on the page and "fill" them with desired colours and papers. To do this select the shape you want to change. Then go to your "papers" ribbon on the side of your screen. Find the paper you want. Right click on the paper. A drop down menu pops up. Select "fill selected shape". The paper you selected will be added to whatever shape you have selected. In a matter of a few clicks you can have an entire page completed!

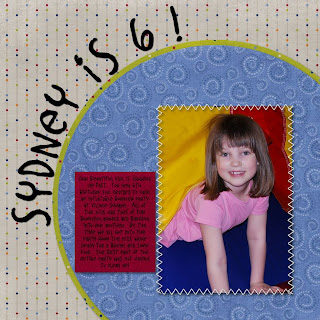
Here is a picture of the template I started with as well as a completed scrapbook page. This layout was given to everyone on the "Chirper Challenge" Blog and I decided to create my own version using my storybook software.


If you are interested I have put it up on 4shared.com. Please follow this link all I ask is you leave a comment. I love to find out who has benefited from my blog. I would also love to see your finished product.

Recipe:
All of the papers were from the CM Best Buds Digital Quick Kit
The stitching was from CM Pets Digital Quick Kit
Font: Scrap Brother

New Digital Add Ons!

Hi All,

I just added to my digital scrapbooking collection and tried out the new papers and embellies. I purchased the Cottage Garden collection through Creative Memories as well as the predesigned pages. I like using the predesigned pages as a starting point for my creations. I also like using them as templates and changing the papers and the colour schemes to meet my needs. Here are a few pages I did of my daughter. They were both predesigned pages that I added my pictures and journaling to. Very easy and very fast. If you are short on time or in a creative rut then templates are a fantastic place to start.